These 5 tips are my secrets for taking and editing high-quality square images for Instagram and Foodgawker.
I was chatting with a fellow blogger, Jenna over at A Savory Feast, a few days ago about a workshop she’d taken for creating great images and other tips for growing your Instagram. She casually commented that I might not need the tips because “your pictures are always great!” (By the way, that message totally made my day Jenna!) I followed up by disclosing that I take a lot of my Instagram photos with my DSLR and then crop and edit them with Lightroom before sending them to my phone to upload to Instagram. (Here’s what’s inside my camera bag in case you missed it.)
You might consider that “cheating” if you’re going for a smartphone camera only social media platform, but you know that all the major brands (and larger bloggers) are doing exactly what I do, so I don’t feel bad about it in the least. I still took the photo didn’t I? Plus it keeps my “brand” and the look of my IG feed nice and high quality, just like my blog. (Don’t worry – I still break from food blog images from time to time to post a few selfies or random travel shots with my phone camera.) The other benefit to creating these square images is that food photography sites like Foodgawker and Tastespotting, or Link-ups like Inlinkz also ask for square images for their tiles and thumbnails, so you get a 3 for 1 return for your effort.
Here’s my 5 tips for creating square images:
1. Be intentional about composing blog photos that will work as a square.
While you can crop a typical resolution photo down to a square, square photos that are composed for that size will look a million times better. (Side note so I don’t lose anyone: Square photos are also called 1:1 resolution or one to one ratio photos because both length and width are equal. Also IG=Instagram.)
Here’s an example of 2 possible IG photos from my Sausage and Pepperoni Pizzadillas I edited in Lightroom:
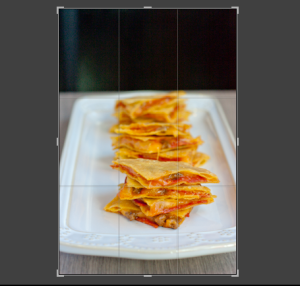
I took this photo using my camera grid and intended to crop it down to 1:1 for Instagram.
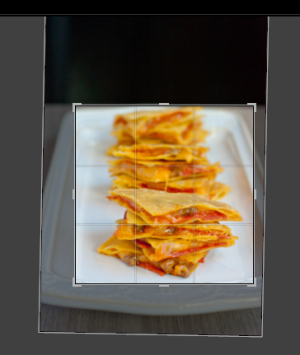
Here’s the crop and straighten.

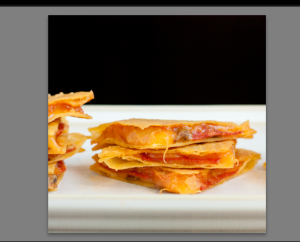
Here’s the final image I’ll post to IG.

Here’s one of the photos I took for the recipe post on my blog.
Here’s the square crop from that photo. I tried shrinking and shifting where I took the square, but couldn’t get the left stack of pizzadillas out of the shot. It’s not awful by any means, but I like the intentional one way better!
2.Use the grid overlay on your camera to frame up a square shot.
Most cameras (even cell phones!) allow you to turn on a grid overlay that you can see on your screen while taking a photo. (Each camera’s settings are different, so I can’t tell you exactly where to find it, but a quick Google search for your camera model + grid overlay should turn up instructions on how to turn it on somewhere in the settings menu.) On my DSLR, 4 of the little grid quadrants frame up a perfect square, so I use them to line up the shots I intentionally take for IG and Foodgawker shots. Use a bit of trial and error to figure out where a square lines up with your camera’s grid. Once you do, you’ll have a never-fail guide for getting the perfect square composition.
My DSLR ran out of batteries (don’t forget to charge your camera batteries…), so here’s a screenshot of the grid overlay from my cell phone camera:
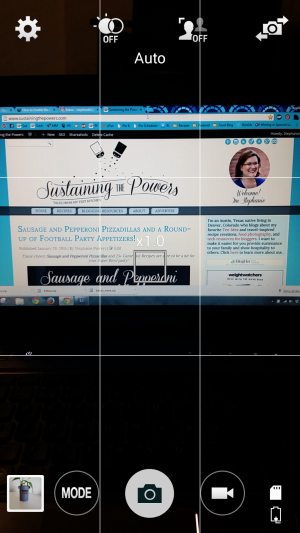
See how easily that helps me frame the shot for Instagram?
3. Shoot in portrait orientation.
I find it easiest to get a good square shot if I shoot with my camera up and down rather than side to side. The left and right edges of the frame help stop me from cutting off anything important in the shot later (or having overhang like the pizzadillas) and I can just leave a larger amount of blank space above the dish I’m shooting. (double bonus: that blank space is great for a text overlay for Pinterest!)
Here’s an example from my Rosemary Sea Salt Roasted Almonds:
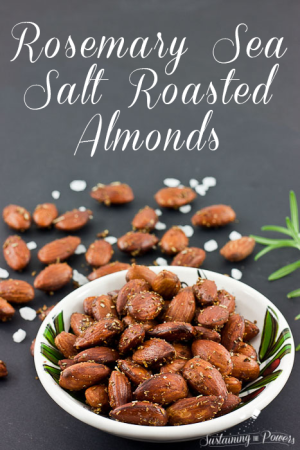
Pinnable image
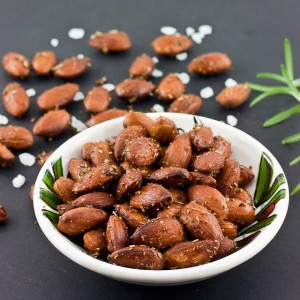
Instagram and Foodgawker image.
Two birds killed with one stone! (Lazy bloggers unite!)
4. Crop/resize your square photos to 640 x 640 pixels with Lightroom, Photoshop, PicMonkey or even MS Paint.
Instagram loves photos that are 640 x 640 pixels because that is its native resolution. (Native resolution basically means the dimensions of the image that the platform is designed for.) Photos that are saved at that size and the uploaded to IG are going to look the absolute best.
Have you ever seen an image that looks grainy because it’s been re-sized awkwardly?
Take this image of my Jicama Strawberry Summer Salad for example:
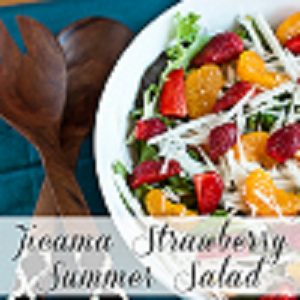
Not so great right?
That image is an example of an Instagram photo I exported that was way too small and IG tried to enlarge it to fit. Total fail! The colors might look awesome, but nobody is about to click like on that one right?
Here it is at the proper resolution:
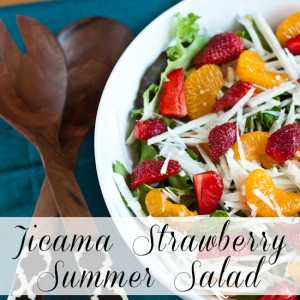
Much better!
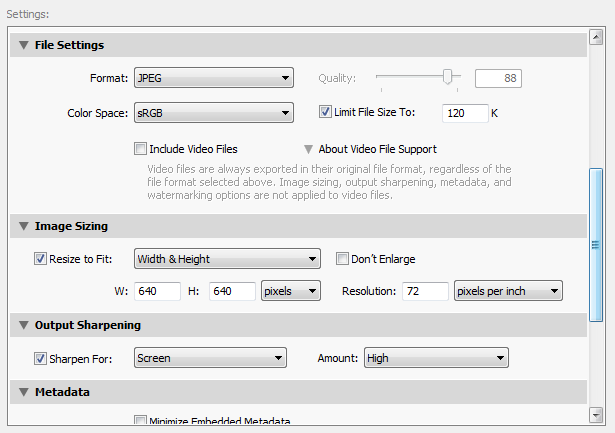
For you Lightroom users, here’s the settings I use to export my images in Lightroom for the best results on Instagram:
And for those of you that want to use free software, here’s how to crop and re-size an image for Instagram using PicMonkey:
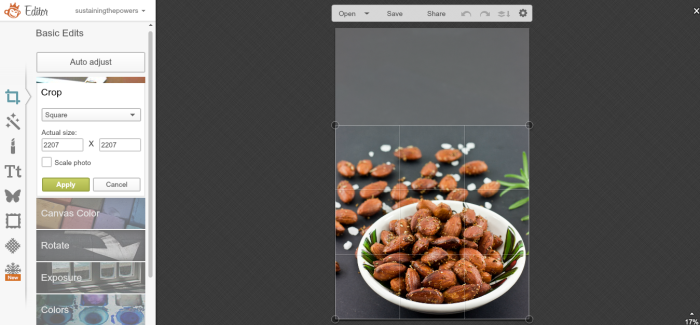
Open your image in PicMonkey, click on the crop tab at the left of the screen and select “square” from the drop down menu.
Drag the box as wide as you want it and line it up where you want to crop the image then click “Apply.”
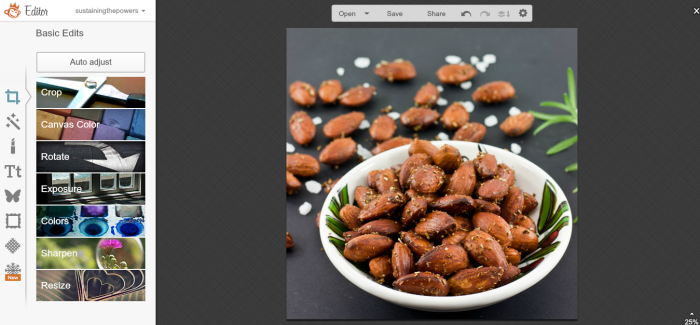
Ta da! It’s cropped into a square, but my image is really large, so I want to re-size it.
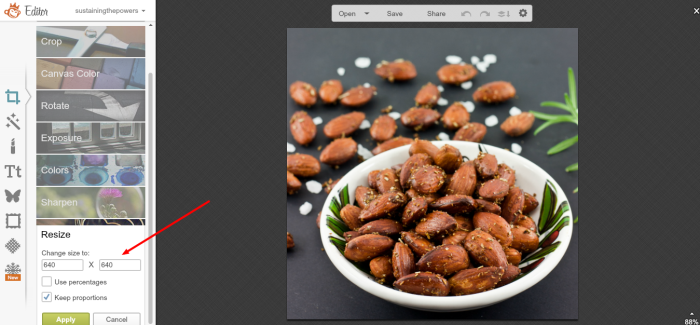
Click on the resize tab and type in 640 x 640 and select “keep proportions” to avoid warping your image. Click “apply” and then you’re ready to save your image.
5. Use Dropbox to easily get your Instagram images to your phone.
While there are one or two services out there that claim to be able to upload to Instagram from your desktop computer, I’ve heard horror stories about Instagram blocking accounts that use them or the services breaking things so that nobody can comment on your photos, or hashtags don’t work, etc. I’m not sure if any of those stories are true, but it’s really not worth the risk to find out. I use the free cloud service Dropbox to transfer files to and from my mobile device. (Don’t have Dropbox yet? The first 2GB of space are totally free and you can sign up with this referral link and we’ll both earn 500mb of extra space!)

To get the image from your computer to Instagram via Dropbox:
Get a Dropbox account and install the Dropbox app on both your smartphone and your computer.
Save your image to a folder inside your Dropbox (I call mine “Upload to Instagram.”) A video on how to do that is here if you need it.
Open the Dropbox app on your smartphone and find the image you just saved to it.
Click on the circled arrow icon next to the image you want, then select More>Export>Instagram
From there, you just crop and edit your image, add the caption, add a filter, etc and share it like you would with any other Instagram photo.
I love storing the images in my Dropbox because I can go back and grab older archives for a #tbt or just to re-share something I want to call attention to again.
Bonus Tip: If you really don’t want square photos, there’s mobile apps to add borders to your standard size images to make them square for Instagram.
I didn’t want to make this “6 tips” and change my graphic, so I’m throwing this one in as a bonus. I sometimes use an app called Crop ‘n Square (Android) for older photos that I didn’t take square shots for, or photos that I just love as-is and want to share. (Like a wedding photo for example.) A quick search of the iTunes of Android app stores will turn up a ton of options for you.
This is great if you just want a quick fix without all the work, but all the food porn websites like Foodgawker won’t accept this, and you won’t have it for Inlinkz or your awesome pinnable text overlay, so I still think you might as well go all out and make your perfect square photo while you’re at it.


I have learnt so much from this and cant thank you enough! I absolutely love instagram and its probably my favourite social network, but my heart always sinks a little when my blog photographs dont fit the size. I never thought to use the grid overlay, and most of my shots are landscape. Im going to start using the grid more often and try shooting in portrait. Thanks so much for this! 🙂
You’re welcome! It’s so funny how the little, easy things like that can make such a huge difference. Tag me when you post some new images with these tips. I’ll be on the lookout for new photos on IG. 🙂
These are GREAT tips! I love Instagram, and have definitely been more intentional on my shots because I always think, “will this look good as a square?” Awesome points as always, Stephanie! And I just realized that you’re in Austin. 🙂 No wonder you’re so friendly. My sister lives there and I live in Houston. Yay for Texas bloggers!
Thanks Kristy! I feel like it helps so much to be intentional. I used to think it didn’t matter and just cropped here and there, but then I saw the difference.
And yep! I’m a Texan. (The y’all didn’t give it away sooner?) I was born and raised in Austin (technically Pflugerville if you know where that is), but I currently have been transplanted to Denver, CO because I love my hubby and my hubby loves Denver and his job here. (I am always so homesick for HEB it’s not even funny!) People here seem to think my friendliness is either really strange or I’m flirting with them. (And that’s how I met my husband by striking up a conversation with a random stranger (like you do) in a computer lab.)
This was super great! I love the technical side that you got into.
Thanks!
Eryn
Glad I could help Eryn!
Hey there Stephanie,
Great tips! I have been using FB, twitter and Pintrest for my blog – but only this week put a new one on Instagram – the reason? Too big of a pain – I have been emailing the photo to myself, opening and saving on my phone and then putting in Instagram – thanks for the tips! I will put this on my to do list! Thanks! Wendi
I used to do that too until I realized that the magic of Dropbox would make it soooooo much simpler! Now I don’t have to clear out my email inbox quite as often. 🙂 I bet you get accepted to Foodgawker often. Your photos are always so drool-worthy.
great tips! I use the whitagram app for editing some photos for instagram.
I tried whiteagram for Android because I heard awesome things about it for iPhone. Sadly, the app didn’t seem to work very well for me (kinda glitchy), so I use Crop ‘n Square instead. Do you prefer the white border photos to square photos? Do they get the engagement you’re looking for?
These are GREAT tips! My goal for this month is to work on improving my instagram feed so that it include more of my blog and less of my dog, haha! Thank you!
You could always just get your dog their own IG feed. 😀 I know Sally from Sally’s Baking Addiction did that. Dog photos are usually cute though. 🙂 What’s your IG name? I’d love to come check out your feed.
My instagram handle is @chelscarr. I have been contemplating getting a separate feed for my pup, but since my blog is named after her, I figured I should keep it all together!
Oh! I didn’t put together that Rosie was your puppy because I hadn’t read your sidebar blurb yet. That totally makes sense to have in your feed then. Maybe you could have her “talk” about your blog in your IG feed?
Thanks for sharing. These tips will be very helpful.
You’re welcome Kimberley! Glad I could help!
Thanks for the shout-out, friend! And I’m so glad you shared this tutorial. I need to be more intentional about composing images for Instagram and Foodgawker. Usually it’s just an afterthought! I’m going to be trying your tips.
You’re welcome Jenna! (I hope it’s okay that I quoted you.) Our chat got me thinking, and I typed up a few of these tips to send back to you. Then I realized I should probably just write a post about it. So thanks for the inspiration!
Great tips! (And those almonds look divine!) I just started using IG so this is very timely for me!
Thanks Meredith! I hope these tips help you out. I love Instagram because everyone enjoys connecting there. I think you’ll love it. (And the almonds definitely are super yummy! You should check out the recipe.)
Good tips, Stephanie. I often take the majority of my photos portrait just because it make getting a good Pinterest shot easier. I’m glad it will help with square photos too.
I like your berry picture, and I’m glad to hear the correct sizing. For my blog phitos I often use around 550 across — what do you use for blog photos?
I find myself preferring landscape over portrait just because plates of food are typically created to be enjoyed from that perspective when they come to the table. I want to feel like I’m right there about to eat it. So I have to be intentional about taking portrait shots.
I typically save my recipe photos with the long edge set at 700 pixels. But that is only because I want my photos to be as wide as the text on my blog posts so you get the magazine type full bleed layout. The ones in this post are mostly 300 pixels wide because I don’t want them to take up the while screen. The proper size for blog photos really all depends on what size your theme is, the look you’re going for, and how large the photos are coming out of your camera. I have to shrink my file sizes and image sizes a lot from what comes out of my camera so they don’t slow down my site.
Thanks.
Thank-you for linking up to Bloggers Brags Pinterest Party. I have pinned this to our board.
Thanks for the pin and for hosting the party Candice! I love linking up with you guys!
Great information, very helpful! I’ll be sharing it all around! I have Aperture on my MAC but I’ve been thinking about switching back to a PC and I may get Lightroom when I do…everyone I know that uses it loves it! Thanks for linking it up with us at #FoodieFriDIY!
Thank you Michelle! I 100% recommend the Lightroom software. (You can have it on your Mac too!) There is seriously no better thing for editing photos. It does all the things you used to be able to do in an old-school darkroom, and does wonders if you shoot your photos in raw format. I resisted purchasing it for so long, and now you couldn’t get me to ever give it up. I have been focusing more on free software lately, but I have some posts about Lightroom in my editorial calendar for earlier next month. I may even do a screen capture video tutorial of my editing process.