How to Create and Install a Favicon for your WordPress Blog using a simple plugin!
One of the biggest things you can do to brand your blog is to create a custom favicon. If you don’t know what a favicon is, it’s that little square on your browser tab that looks like this:
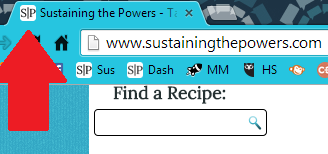
Favicon is short for “favorites icon”. In addition to your browser tabs, it also shows up when you bookmark a site (see the bookmarks tab below the URL in the photos above), it shows up below pins from your site when you have validated your blog with Pinterest (here’s my post on how and why to do that if you’re not verified with Pinterest already), and it will show up as a mobile icon or Windows 8 tile if a user bookmarks your site to their homepage.
Too often I’ve seen bloggers stick with the default favicon for their theme (That white butterfly on a purple background is EVERYWHERE), or, worse, the Hostgator alligator, or whatever the default icon is from their hosting provider. When you do that. you’re missing out on a HUGE opportunity to add to your branding. I’m going to guess that when you see the Pinterest icon, the Gmail icon, the Instagram icon, or the Facebook icon you recognize it immediately. That’s because it’s consistent across all their branding. You can start to have the same recognition for your blog with just a quick little plugin.
How to Create and Install a Favicon for WordPress
Step 1: Decide what you want your icon to be. My icon is S|P. It’s got a few different meanings – SP for Sustaining the Powers, SP is for Stephanie Powers (ie my monogram), S|P looks like the symbol for salt and pepper which ties into the recipe blog and matches the salt and pepper from my logo. It’s also done with one of the 3 fonts (Lora) that I’ve decided to stick to for all my blog work and branding.
Step 2: Design the image. You can do this in MS Paint, Canva, PicMonkey, Photoshop, etc. Choose your favorite software.
Some tips:
- You want to keep the image simple (it’s going to be so, so tiny). A photo is usually too detailed. Straight lines shrink better than curves. Letters are really popular, though any more than 2 is probably too many.
- You typically want to keep it at 2-3 colors max.
- Create an image that’s at least 260×260 pixels – it will be compressed and re-sized by the plugin to the correct size, but they like to have a larger image to work with.
- You want it to match the rest of your blog branding.
- Use .jpg or .png
- Transparent backgrounds are fine as long as you have good contrast for your image. (Save as .png to keep transparency.)
Update 9/15/15: From WordPress 4.3 onwards, it is recommended that you use the Site Icon feature that is built into WordPress, instead of following the guidance below. The Site Icon feature can be found by going to Appearance -> Customize and clicking on Site Identity.
Step 3: Install and activate the Favicon by RealFaviconGenerator plugin for WordPress.
Step 4: Once it’s activated, go to Appearance>Favicon from your WordPress Dashboard
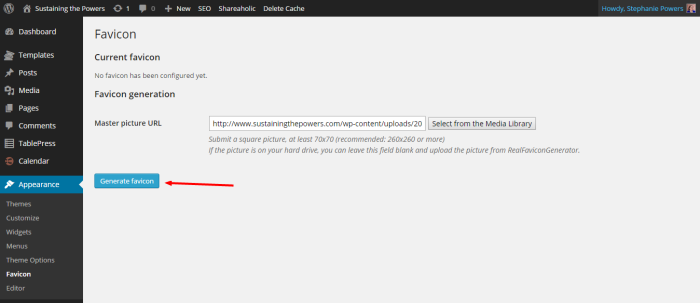
Step 5: Click “Select from the Media Library” and either select the image or upload the image to your media library and select it.
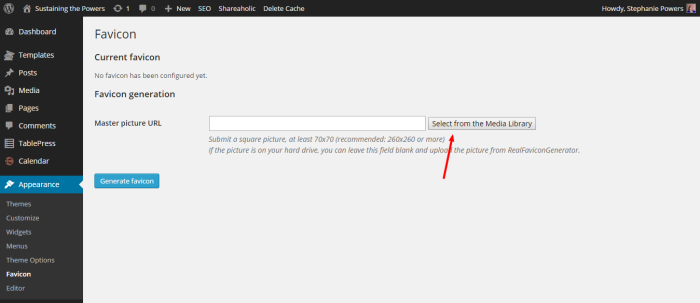
Step 6: Click “generate favicon”.
Step 7: You’ll be re-directed to the RealFavicon Generator and it will ask you to fill in some settings. You can leave them at default if you want, but I configured mine just in case someone wants a Windows 8 tile or a mobile icon bookmark of my page. (I can pretend y’all love me that much right?)
Here’s how I filled in my settings (click to enlarge):

Step 8: Click “Generate your Favicon and HTML code” and it will do its thing, generate your icon, and then automatically take you back to your blog and install it. (The best part of the plugin!)
You should see these results:
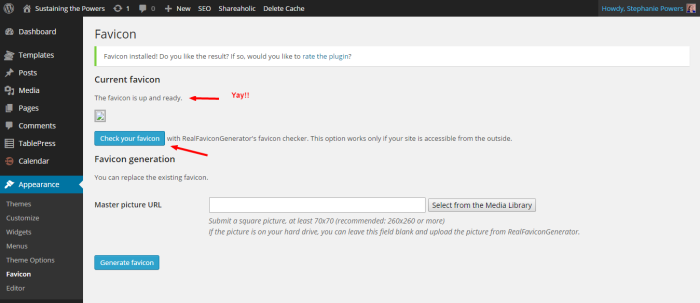
Step 9: Click the button to “Check your Favicon” and see what it now looks like! (Note: you may get a few warnings on the checker page about not having all the icon sizes for iOS, etc. You don’t need to worry about those since you’re a blog, not an iPhone app.)
Note: Sometimes when installing a new favicon, it won’t look like anything changed when you look at your blog again. That’s because a favicon is one of the things that gets cached in your browser. Clearing any caching plugins you may have on your blog, and deleting and re-adding any bookmarks you may have for your site typically makes your new icon show up for you, but if it doesn’t, rest assured that everyone else is still seeing it and you may just have to check on a friend’s computer, or be patient.
 to Verify Your Blog With Pinterest and Get Rich Pins")


I’ve just bookmarked this post for my husband to read. He was literally asking me how to change the favicon (we didn’t even know that’s what they were called) for our business website the other day. I’ll thank you now on his behalf and for me. Great stuff!
That’s awesome! I’m so glad I could help you out. (And sometimes half the battle is figuring out what the heck these things are called so you can search for them!)
This is how I installed my favicon! That plugin makes life so much easier. I chose a fork and knife for my favicon and used one of my blog colors to tie my theme into it even more.
You’ve done such a great job with your branding! I have seen a few of your images around Pinterest and knew right away that the fonts and colors were yours.
I just used your tips to create my favicon!! I’ve never done this before and I’m thrilled! Thanks so much, Stephanie! 🙂
That is so awesome!!! I’m so glad it worked for you Hannah! It looks great!
As the author of RealFaviconGenerator and the WordPress plugin, all I can do is approve 😉
Haha. I’m glad you approve!! Thank you for making a plugin to make the process so easy! I’ve walked people through how to do it previously, but it normally involves getting access to the FTP which can be troublesome for people who may not be as tech savvy or have managed hosting accounts. I’d love it if you shared my post!
Absolutely! Tweeted a minute ago!!
Do you know where the file is saved for tall the favicon? I wanted the general favicon to be different than all the web clips, because at different sizes it doesn’t look as good one way. I was hoping to open the plugin via ftp and find a file, but couldn’t find any files.
Favicons are always determined by the file favicon.ico in the root directory of your webpage. This plugin essentially just interfaces with the generator and then places that favicon.ico file there in the root for you. (It’s great for people who don’t want to mess with ftp.) A .ico file will save all the many different sizes in the one file, so you won’t be able to just change one of the images if you get to that file without un packing it. There are many options with the generator though, so I might suggest you look through those and make your edits there, or just use the generator without the plugin and install it yourself via ftp. Does that answer your question?
Awesome tutorial! So easy to understand. I did mine in 5 minutes! Thanks, Stephanie! 🙂
Thanks for the tutorial Stephanie, really helped!